
 If your kids are into glitter tattoos like mine is – here is a tutorial from my daughter, and some money saving tips from me to do these at home!
My daughter always wants these done when we go to fairs and events, and we found a kit in the clearance at Micheals so figured worth a shot. Since then we’ve figured out some great ways to really cut costs so we are sharing them with you!
You can of course buy a kit, but if you want to do it cheaply here are my tips:
– Use the proper glue, it’s on sale at Michaels half price this week. Other weeks you can just use a 40% off coupon.
– For the glitter you can use the brand name ones, or even just regular glitter (fine not chunky) from dollar stores, Michaels etc. And if you’re lucky you will find the brand name stuff at Dollarama!! 2 jars of Tulip glitter for $1!
– For your brushes, pick up a few sets at the dollar store. The glue has it’s own applicator, so you need some for the glitter and one big one to brush it away. Get a few for the glitter as they get sticky and you have to work quick enough.
For the stencils, you can buy packs at Michaels or online – you can even get creative and freehand. Get stencils with sticky backs for the kids as it makes it a lot easier.
I’ve seen the smaller basic kits run from $20-$40, you can easily assemble a gigantic kit for under $20 with way more glitter and brushes.
Once you’re set up and bought all the components, set up a glitter zone – put down paper towels, newspaper etc. or send the kids outdoors to do them on a nice day! It’s very simple to do:
1. Pick out your stencil and stick it on.
2. Spread glue over the cutout areas
3. Layer your glitter over the glued areas – a lot of kits tell you to remove the stencil first, we’ve found there’s no need to do so. And if you’re doing a large tattoo do the glue and glitter in sections so it doesn’t dry out. Brush away the excess glitter.
4. Let it dry for a few minutes and peel off the stencil carefully.
5. You’re done! Enjoy your tattoo – it will last anywhere from 2-7 days depending on what you’re doing. We’ve gone swimming with ours, showered etc. and they stay on. You can remove them with baby oil, or just scrub them with soap when you’re tired of them.
Kids absolutely love these, doesn’t make too much of a mess and you can really customize them. Kids can write their names, freehand little pictures – and there’s an amazing amount of stencils out there to choose from too. We’ve been doing these for a few weeks and the fun hasn’t worn out – even grandma is sporting quite a few of them!
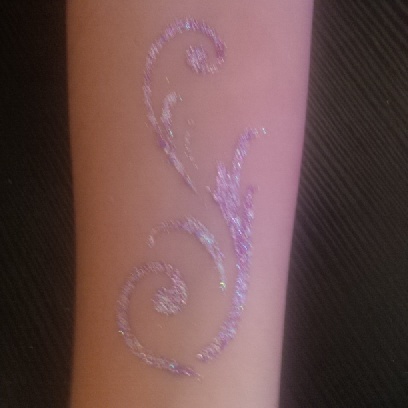
 My 8 year old does them by herself, on her opposite arm so you can really see it’s not hard to do. By leaving the stencil on for the harder ones you can really get creative with the colours without the glue drying up on you. A fun summer project for playdates, rainy days, to bring to the lake to keep kids entertained. Or for a themed event or party even!!
And you know our motto, if we can do it anyone can! Another super simple fun craft to do!